Tuesday, February 24, 2009

How to Compile Blender with Yafaray support in Ubuntu

Blender is the most popular open-source 3D application. it's capable of modeling, texturing, animation, composition, etc.

Yafaray is an external rendering engine, built to simplify (a bit) the setup of lights.


Download the Script to compile

This instruction relies heavily on a Script by Mr. Greenthumb, called sevenblend. So first, download the script here.

extract the files on a folder, say sevenblend.


Download Needed Packages

We need, a number of packages for checking out source files, and compiling. To download, do this on the terminal:

sudo apt-get install subversion libqt4-dev binutils swig scons libpng12-dev gcc g++ libalut-dev libsdl-sound1.2-dev libopenexr-dev libjpeg62-dev python2.5-dev python2.6-dev libtiff4-dev gettext libxi-dev libfreetype6-dev libxml2-dev yasm
Execute the script

Next thing, execute the script. go to the directory where you uncompressed the downloaded script, then execute the script by doing this on the terminal
./sevenblend.sh

Hopefully, it should all work without errors.

If you've tried this using older versions of ubuntu (prior to ubuntu 9.04), delete the .sources directory under sevenblend folder first before doing the "./sevenblend.sh"

Enjoy Blender with yaf(a)ray support :D go to your home directory and look for sevenblend link, double click it and it should run blender.

You can actually optimize the build for your own CPU... that will be the next topic on my next post..

Monday, February 23, 2009

Compiling Gimp on Ubuntu

Gimp is the premiere photo-editing software of the Open-source world. It is similar to photoshop in terms of function.

You can install gimp using the Synaptic Package Manager, but it doesn't usually give you the latest version of Gimp.

anyway, if you still insist on installing gimp using ubuntu repositories, do this
sudo apt-get install gimp
In order to get the latest version of Gimp, you need to compile it yourself.


Installing the Required Packages

Make sure gcc, g++, ruby, and the development versions of some basic libraries.
sudo apt-get install gcc g++ ruby
If one of the "configure" processes below fails because it needs a certain library, install it. For example, if configure tells you "Can't find xxx", install "libxxx-dev".

For my version of Gimp, i installed the following packages:
graphviz-dev libaa1-dev libexif-dev libgnomeui-dev libgtk2.0-dev liblcms1-dev libpoppler-dev librsvg2-dev libtiff4-dev libwebkitgtk-dev libxpm-dev python-gtk2-dev

to install these on your system, do this on the terminal:
sudo apt-get install graphviz-dev libaa1-dev libexif-dev libgnomeui-dev libgtk2.0-dev liblcms1-dev libpoppler-dev librsvg2-dev libtiff4-dev libwebkitgtk-dev libxpm-dev python-gtk2-dev

Download the Tarballs

Download the tarballs from the respective file servers (make sure to download the latest version):
babl from ftp://ftp.gimp.org/pub/babl/
GEGL from ftp://ftp.gimp.org/pub/gegl/
GIMP from ftp://ftp.gimp.org/pub/gimp/

extract them on your PC, say on build_gimp folder.


Compiling Gimp

first, compile babl first.. go to the babl folder (be sure you're on build_gimp folder)
cd build_gimp
cd babl-xxx
xxx is the version number of babl.
then, do the following (make sure you are still in the babl-xxx directory
./configure --prefix=/opt/gimp-2.6
make
sudo make install

second, Make binaries, includes, libraries in /opt/gimp-2.6 available for use. Do this on your terminal.
export PATH=/opt/gimp-2.6/bin:$PATH export LD_LIBRARY_PATH=/opt/gimp-2.6/lib export PKG_CONFIG_PATH=/opt/gimp-2.6/lib/pkgconfig


third, go to the gegl directory
cd ..
cd gegl-xxx
gegl-xxx is the directory of the extracted gegl tarball. Then do this on the terminal (make sure you are still in the gegl-xxx directory)
./configure --prefix=/opt/gimp-2.6
make
sudo make install


lastly, go to the gimp directory
cd ..
cd gimp-xxx
gimp-xxx is the directory of the extracted gimp tarball. Finally, do this on the terminal (make sure you are still in the gimp-xxx directory)
./configure --prefix=/opt/gimp-2.6
make
sudo make install


Enjoy Gimp

If all went well, you can find your newly compiled gimp under
/opt/gimp-2.6/bin/

and look for gimp 2.6


Error
If in case you encounter an error similar to the following:
make[1]: Leaving directory `/home/garu/downloads/gimp/gimp_build/gimp-2.6.5/themes' Making clean in cursors make[1]: Entering directory `/home/garu/downloads/gimp/gimp_build/gimp-2.6.5/cursors' test -z "gimp-tool-cursors.h tool-cursors.list" || rm -f gimp-tool-cursors.h tool-cursors.list rm -rf .libs _libs rm -f *.lo make[1]: Leaving directory `/home/garu/downloads/gimp/gimp_build/gimp-2.6.5/cursors' Making clean in tools make[1]: Entering directory `/home/garu/downloads/gimp/gimp_build/gimp-2.6.5/tools' Making clean in . make[2]: Entering directory `/home/garu/downloads/gimp/gimp_build/gimp-2.6.5/tools' rm -f gimptool-2.0 gimptool-2.0 rm -rf .libs _libs rm -f test-clipboard test-clipboard rm -f *.o rm -f *.lo make[2]: Leaving directory `/home/garu/downloads/gimp/gimp_build/gimp-2.6.5/tools' make[1]: Leaving directory `/home/garu/downloads/gimp/gimp_build/gimp-2.6.5/tools' Making clean in m4macros make[1]: Entering directory `/home/garu/downloads/gimp/gimp_build/gimp-2.6.5/m4macros' rm -rf .libs _libs rm -f *.lo make[1]: Leaving directory `/home/garu/downloads/gimp/gimp_build/gimp-2.6.5/m4macros' Making clean in . make[1]: Entering directory `/home/garu/downloads/gimp/gimp_build/gimp-2.6.5' rm -rf .libs _libs rm -f *.lo make[1]: Leaving directory `/home/garu/downloads/gimp/gimp_build/gimp-2.6.5'
do the following in the terminal
make clean

and repeat the process.. make sure to follow the steps carefully.


Create a Launcher

To create a launcher from the Applications menu, Right-click on the Applications menu, and select Edit Menus.
Go to the Graphics section, and click on New Menu.
in the Name, put Gimp (or whatever you want), in the Command, go to
/opt/gimp2.6/bin

and select gimp 2.6
press OK.

There you have it, the latest version of gimp on your PC!


if you enjoyed this post, please leave a comment, or subscribe.

Wednesday, February 18, 2009

How to Create Virtual Machines in Ubuntu

Virtual machines allows you to run multiple operating systems on a particular operating system. For instance, you're currently running Linux and within linux, virtual machines enable you to install & run Windows (!) therefore windows all your Windows applications.

According to freesoftwaremagazine.com, there are four (big ones) virtualization tools to use: Parallels, VMWare, QEMU, and VirtualBox. Parallel is not free, so you have to pay for it. VMWare has free versions, i've tried it but didn't work for me, and besides, the download took around 580MB. From what i read QEMU is command-line, so it's very complicated to create a new virtual machine (although there are GUIs made for it). The last option, and i believe the best option we have, is VirtualBox.

There are two available version of VirtualBox: the free Open Source Edition, and the Personal Use and Evaluation license.

The easiest to install, coz it's the one i've tried is the Personal Use and Evaluation license.


Download the Installer

Head over to
http://www.virtualbox.org/wiki/Linux_Downloads

to download the installer for your version of Ubuntu. i've downloaded the virtualbox-2.1_2.1.4-42893_Ubuntu_hardy_i386.deb, and it's only 36.2MB! Compare that to the 580MB download for the VMWare server.


Install the Required Packages

We also need to install some packages before we can install virtualbox.

in the terminal do this
apt-get install bcc iasl xsltproc xalan libxalan110-dev uuid-dev zlib1g-dev libidl-dev libsdl1.2-dev libxcursor-dev libqt3-headers libqt3-mt-dev libasound2-dev libstdc++5 linux-headers-`uname -r` build-essential
in case you don't know where the terminal is, go here.


Install VirtualBox

Go to the directory where you've downloaded the virtualbox installer. Double-click it, and the package installer should say all dependencies have been satisfied. If not, the installer will automatically install the required packages.

Click on Install Package.

if incase the shortcut to VirtualBox cannot be found under
Applications>System Tools>Sun xVM VirtualBox
in the terminal do this
sudo /etc/init.d/vboxdrv setup

Just answer yes to all of the questions asked :D

after that, you should find the Sun xVM VirtualBox short cut link. click it and you're ready to go.

If VirtualBox shortcut link is no where yet to find, press Alt+F2, and type VirtualBox (take note of the capitalization). That should bring about the link, and should also start VirtualBox.


Creating a Virtual Machine

On the VirtualBox window click on New and the following window will appear, welcoming you to Create a New Virtual Machine Wizard. simply click on Next.

Specify the Virtual Machine name and operating system type. For example, you are to install Windows XP, choose the following settings.Next, we specify how much memory will be alloted to your virtual machine. Assign 192MB for now, anyway, you can always change that later.
Next, we'll be creating a virtual hard disk. If there is already an existing virtual harddisk, click on Existing, otherwise click on New..
Simply click Next.
You are now to select the Hard Disk Storage Type. I chose a dynamically expanding storage to save disk space on my "real harddisk"
Specify the disk location and size. Since i'm just installing Windows XP, 1GB is enough for now. But remember, since i specified dynamically expanding storage, that size will expand later, if the OS needs more hard disk space.
The summary will be shown to you. Click Finish. You will now proceed with the remaining process of the creation of virtual machine.
The Summary of you virtual machine settings will be shown to you. Click on Finish.

Finally, you are now ready to run your new virtual machine. Click on Start and it will prompt you to insert the CD for your new operating system. The installation of Windows XP should now begin.

I won't be covering the installation process here..it's up to you to experiment. anyway, if you make a mess of things, you can simply delete the virtual machine by selecting it and clicking Discard.

If you found this simple tutorial useful, please subscribe or leave a message. :)

Tuesday, February 10, 2009

Install Softwares on Ubuntu without Internet Connection

When installing ubuntu, it's a must that you have an internet connection when installing softwares since the software packages are downloaded from ubuntu's repositories.

But what if you installed ubuntu on a PC that is not directly connected to the internet?

there is hope.. this post is all about this.. Installing Softwares on Ubuntu without Internet Connection. (atleast without your PC directly connected to the internet).

you'll be needing a couple of things:
  1. your PC where ubuntu is installed (no internet connection)
  2. another PC which is connected to the internet (good if ubuntu is installed here as well, if not, you can always run ubuntu using liveCDs)
  3. usb flash drives (you'll use this to copy your downloaded packages)
  4. Ubuntu LiveCD (incase the PC connected to the internet has windows installed on it)

Upating your PC

Assuming your PC is newly installed with Ubuntu, you need to update it: meaning download all files needed by ubuntu for it to know all the location of softwares (and also the list of softwares)

on your terminal, do this: (in case you don't know where the terminal is, see this link)
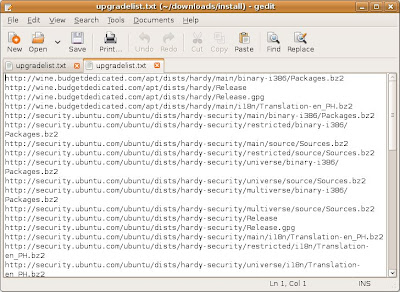
sudo apt-get update -qq --print-uris |cut -d\' -f 2 > upgradelist.txt
That command will generate a file named "upgradelist.txt" which contains a list of files to be downloaded later on the PC with internet connection. On my pc upgradelist.txt looks like this:

Copy that file (upgradelist.txt) on your usb flash drive.


Downloading the Upgradelist.txt

Boot the PC with internet connection using a Ubuntu LiveCD (or using an ubuntu installed on usb flash drive). Then, copy the file "upgradelist.txt" on a folder on the desktop, and name it Upgrade.

on the terminal do this:
cd Desktop/Upgrade

wget -i upgradelist.txt -x
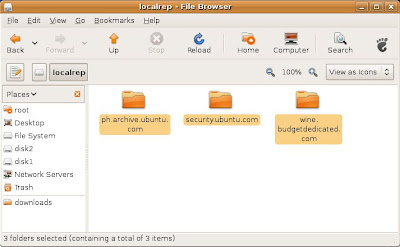
The last command will download all the files on directories. On my PC it downloaded files and put them on three directories:
  1. ph.archive.ubuntu.com
  2. security.ubuntu.com
  3. wine.budgetdedicated.com
Don't worry if we don't have the same directories.

Copy those directories on your usb flash drives, and bring them on your PC without internet connection.


Updating your PC with the downloaded files

Now that you've downloaded the files, we need to put them on your PC and let Ubuntu know where they are. Press ALT+F2 and type
gksu nautilus
That command will open a file manager with root (admin) privileges. Using this file manager, copy all the downloaded directories on the root directory under a directory named localrep.

This is equivalent to doing
sudo mkdir /localrep
in your terminal

The following figure shows my downloaded directories under localrep directory.

Next, we'll be editing the file where the original repositories are listed. Using the file manager with Root privileges, go to
/etc/apt/
and look for the file "sources.list"

Make a duplicate copy of that file and name it "sources.list.bak" (right-click on the file, copy, and then paste). It is important that you are using a file manager with Root privileges to be able to do this.

Incase something goes wrong, you'll be needing that file.

Next, right-click the file and select "Open with Text Editor..." (again it is also important that you are using a file manager with Root privileges to be able to do this)

(again you can open a file manager with root privileges by pressing alt+f2, then typing gksu nautilus)

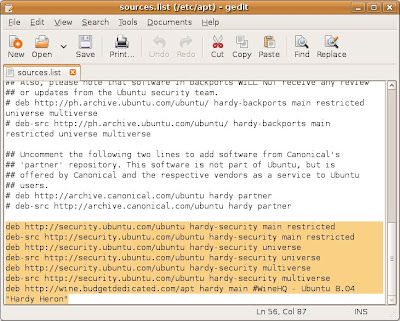
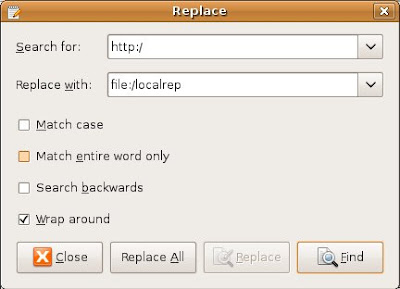
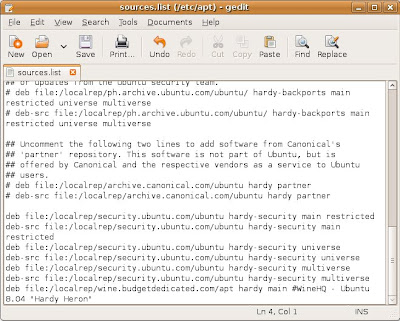
Using the Replace button, replace all http:/ on that file with file:/localrep.

For instance, the line that says
deb http://security.ubuntu.com/ubuntu hardy-security main restricted
should be renamed to
deb file:/localrep/localrep/security.ubuntu.com/ubuntu hardy-security main restricted
see the following figure for reference

Next, we tell ubuntu to use those lines, instead of the original ones. On your terminal do this
sudo apt-get update
Or
under System>Administration>Synaptic Package Manager, click on Reload.

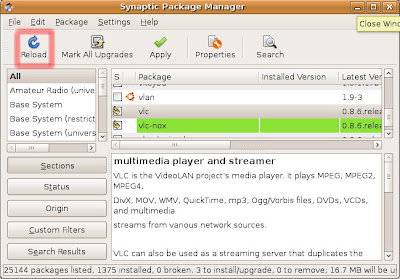
Your PC is now ready to generate a download script file for any software you wish to install.


Selecting the Software Package to be installed

As an example we will be downloading vlc (a multimedia player).

On the Synaptic Package Manager, search for vlc, click on it, and on the pop-up that shows, select Mark for Installation. If it asks you to Mark Additional Required Changes, simply select Mark.

(don't click on Apply yet)

Under File, click on Generate package download script. This will generate a script that will be used to download all the files needed to install vlc on your machine. Save the script as downloadscript.sh.

But first, we need to edit that downloadscript.sh file, and replace some things.

Since that file was created with Root privileges, we also need a text editor with Root privileges in order to edit it. Press ALT+F2, and type
gksu gedit
A text editor will show up, open downloadscript.sh, and replace all instances of "file:/localrep" with "http:/".

Your file should look like this:


Save and Copy that file on your usb flash drive.


Downloading the Packages

Copy the downloadscript.sh on the PC with internet connection under a folder named VLC.

on your terminal, go to the director where the script is saved (in the folder named VLC), and do this
./downloadscript.sh
It will begin to download all the packages needed to install vlc.

After downloading, copy all the .deb files on a folder (or better, copy the entire folder VLC) into you usb flash drive.


Installing the Downloaded Packages

On your PC, fire up the Synaptics Package Manager, by going to System>Administration>Synaptics Package Manager.

Select again vlc, click, and then select Mark for Installation. If it asks you to Mark Additional Required Changes, simply select Mark.

Still under the Synaptics Package Manager, click on Add Downloaded Packages. Go to the directory where the downloaded packages are, click Open. And it will ask you to Apply the Following Changes? simply click on Apply.

vlc will now be installed.


Do the same process if you will need to install any other software.

enjoy!

Sunday, February 8, 2009

Opening a Terminal

Terminals are where you type in commands in linux.

to open a terminal, press ALT+F2, then either type
gnome-terminal
or
xterm
for the classic terminal

Installing KiCad on Ubuntu

If you are an electronics enthusiast, this is a must application for you. It is used to create schematic captures, PCB designs, and create 3D views of the PCB designs.


you can install kicad from the repository by typing
sudo apt-get install kicad
in the terminal. Where the terminal is? see this link.

but, the installed version is not the latest one. so here is a guide on how to install an updated KiCad.


Installing the required softwares and dependencies


we need to install the following: debhelper, dpatch, libx11-dev, libglu1-mesa-dev, libgl1-mesa-dev, mesa-common-dev, libwxbase2.8-dev, libwxgtk2.8-dev, libboost-dev, subversion, cmake (>= 2.6.0)

to install on ubuntu, on the terminal, simply type
sudo apt-get install debhelper dpatch libx11-dev libglu1-mesa-dev libgl1-mesa-dev mesa-common-dev libwxbase2.8-dev libwxgtk2.8-dev libboost-dev fakeroot subversion libboost-serialization-dev
and finally, we need cmake, but we need atleast version 2.6, the one from the repository is not the updated one (atleast for ubuntu 8.04). You can download version 2.6 from here..

but if what the repository gives you is atleast version 2.6, then simply
sudo apt-get install cmake

Getting the Source Codes


we will be getting the source codes through svn. create a directory where you'll be downloading the source codes, and go to that directory. type the following:
svn checkout https://kicad.svn.sourceforge.net/svnroot/kicad/trunk/kicad kicad

svn checkout https://kicad.svn.sourceforge.net/svnroot/kicad/trunk/kicad-doc kicad-doc

svn checkout https://kicad.svn.sourceforge.net/svnroot/kicad/trunk/kicad-library kicad-library
also we need the following
svn checkout http://svn.flexserv.de/kicad/trunk/debian

Compiling


to compile simply do the following on your terminal (make sure you're still in the same directory where you did the svn)
fakeroot debian/rules binary
hopefully, there will be no errors.


Running KiCad

You'll find the compiled version of KiCad on
debian/kicad/usr/bin/
to complete things up, you'll need to copy the following folders
debian/kicad-common/usr/share/kicad/library
debian/kicad-common/usr/share/kicad/modules
debian/kicad-common/usr/share/kicad/template
in here
debian/kicad/usr/share

again, to run KiCad go to
debian/kicad/usr/bin/

and double click KiCad

enjoy!!

Saturday, February 7, 2009

Installing MakeHuman on Ubuntu

MakeHuman is a software application that generates 3D humanoids; similar to Poser or DazStudio. If you need a human model, and want to make it as fast as possible (or simply you don't know yet how to do one), maybe you need this software.


the instructions in this post are based on the instructions from this page.

First, install the software needed to compile. You'll be needing (atleast) the softwares to be installed by the following commands. in your terminal (press ALT+F2, then type xterm). see this link.
sudo apt-get install freeglut3-dev
sudo apt-get install xorg-dev
sudo apt-get install libpng12-dev
Second, download the following files from this link and save anywhere on your drive (say /home/your_account_name/makehuman)
  • animorph-xx.tar.gz
  • makehuman-xx.tar.gz
  • mhgui-xx.tar.gz
Third, extract the downloaded files, by right-clicking on them and select Extract Here.

Fourth, we now compile.. but first open again a terminal (ALT+F2, type xterm) and then cd to the directory where you extracted the downloaded files.
cd makehuman

first,compile and install the animorph..
cd animorph-xx
./configure
make
sudo make install

In first time we must run ldconfig so that MakeHuman can find animorph and mhgui libraries::

and then the mhgui..
cd ..
cd mhgui-xx
./configure
make
sudo make install

and lastly the makehuman...
cd ..
cd makehuman-xx
./configure
make
sudo make install
and after everything went well, we can now execute makehuman, but first we must run ldconfig so that MakeHuman can find animorph and mhgui libraries
sudo ldconfig

and then,finally run makehuman
makehuman
makehuman
makehuman will now open a window.

Lastly, to create a shortcut button on your desktop, we will create a launcher. anywhere on your desktop, right click and select Create Launcher... on the command type makehuman.

and there you go, you have now a button on your desktop for the makehuman.

enjoy!